
Adding an Instagram feed to a WordPress website is one of the simplest ways for a brand, blogger, creator, or business to keep a site visually fresh without manually uploading new images every week. A live feed can display recent posts, reels, tagged content, or hashtag-based visuals directly on pages, sidebars, footers, or landing pages. The good news is that WordPress site owners do not need to write code to make it happen; they can rely on plugins, blocks, widgets, and visual settings.
TLDR: A WordPress site owner can add an Instagram feed without coding by installing an Instagram feed plugin, connecting an Instagram account, customizing the layout, and placing the feed using a block, widget, or shortcode. Most modern plugins handle the technical connection to Instagram automatically. The best results come from choosing a reliable plugin, keeping the design consistent with the website, and optimizing the feed for speed and mobile viewing.
Why Add an Instagram Feed to WordPress?
An Instagram feed can make a WordPress site feel more active, social, and trustworthy. Instead of relying only on static images or old blog graphics, a feed brings in fresh visual content from Instagram whenever new posts are published. This is especially useful for restaurants, photographers, fashion brands, travel bloggers, fitness coaches, shops, event planners, and community organizations.
A feed also helps connect website visitors with a brand’s social presence. When visitors see recent Instagram content, they may be more likely to follow the account, engage with posts, or explore products and services. For businesses, this can support social proof, because real posts, customer photos, and behind-the-scenes content make the brand appear more active and authentic.
Another benefit is convenience. Without an Instagram feed, a site owner may need to manually upload images, write captions, and update galleries. With a feed plugin, much of this process becomes automated. The site remains updated while the content is managed from Instagram.

The No-Code Method: Using a WordPress Plugin
The easiest way to add an Instagram feed without coding is to use a WordPress plugin. A plugin acts as an add-on that gives WordPress extra features. In this case, the plugin connects the website to Instagram, retrieves posts, and displays them in a chosen layout.
Most Instagram feed plugins include a setup wizard, meaning the site owner can follow a guided process rather than editing theme files or adding scripts. Many plugins also work with the WordPress block editor, page builders, shortcode areas, and widget zones. This makes them flexible enough for homepages, portfolio pages, blog sidebars, and product pages.
Common plugin features may include:
- Account connection: Secure linking to an Instagram account.
- Feed templates: Grid, carousel, masonry, highlight, and list layouts.
- Responsive design: Automatic adjustment for desktop, tablet, and mobile screens.
- Custom styling: Options for colors, spacing, captions, buttons, and columns.
- Multiple feeds: Different feeds for different pages.
- Caching: Faster loading by storing feed data temporarily.
- Moderation: Control over which posts appear on the site.
Step 1: Choose the Right Instagram Feed Plugin
The first step is choosing a plugin that fits the website’s needs. A simple blog may only need a basic image grid, while an online store may need product-inspired galleries, tagged content, or shoppable-style layouts. A photographer may prefer a masonry gallery, while a restaurant may want a carousel of recent dishes and customer photos.
When evaluating plugins, the site owner should look for several important qualities. The plugin should be regularly updated, compatible with the current WordPress version, well reviewed, and easy to use. It should also offer clear connection options for Instagram and provide responsive layouts. If the plugin has a free version, it can be tested before upgrading to a premium plan.
It is also wise to consider performance. Some feed plugins load many images and scripts, which can slow down a website if they are not optimized. A good plugin will include caching, image optimization, lazy loading, or other speed-friendly features.
Step 2: Install and Activate the Plugin
After selecting a plugin, the site owner can install it from the WordPress dashboard. The process usually follows the same pattern as any other WordPress plugin installation.
- They go to Plugins in the WordPress dashboard.
- They select Add New.
- They search for an Instagram feed plugin by name or keyword.
- They click Install Now.
- They click Activate once installation is complete.
Once activated, the plugin usually adds a new menu item to the WordPress dashboard. This area is where the Instagram connection, feed settings, layouts, and display options are managed. No files need to be edited, and no coding tools are required.
Step 3: Connect the Instagram Account
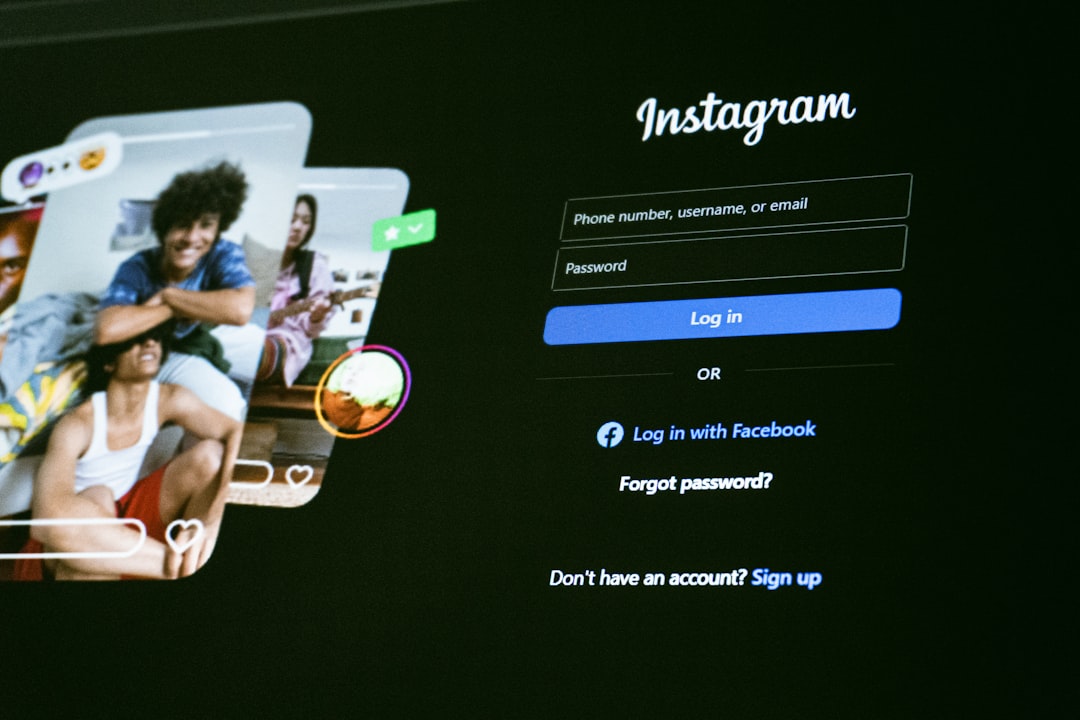
After activation, the plugin must connect to Instagram. This connection is usually handled through a secure authorization process. The site owner clicks a button such as Connect Instagram Account, logs into Instagram or Meta if prompted, and grants permission for the plugin to access public content needed for the feed.
Some plugins may ask whether the account is personal, business, or creator. A personal account is often enough for a basic feed of recent posts. However, a business or creator account may unlock more advanced options, depending on the plugin and Instagram’s available permissions. These options may include hashtag feeds, mentions, profile data, or analytics-related features.
It is important that the account connection is made through the plugin’s official authorization screen. Site owners should avoid tools that ask for Instagram passwords in unsafe or unclear ways. A reputable plugin should use a secure login flow and explain what permissions are being requested.
Step 4: Create and Customize the Feed
Once the account is connected, the plugin can create a feed. Most plugins allow the site owner to choose what type of feed should appear. This may include recent posts from the account, reels, tagged posts, or hashtag content. The exact options depend on the plugin and Instagram account type.
The next stage is customization. A feed should not look like a random element pasted onto a page. It should feel like part of the website’s design. The site owner can usually control the layout, number of posts, image size, columns, spacing, caption display, follow button, load more button, and colors.
Popular layout options include:
- Grid layout: A clean arrangement of square or cropped images, ideal for most websites.
- Carousel layout: A sliding feed that saves space and works well on homepages.
- Masonry layout: A Pinterest-style layout that preserves different image heights.
- Single-row layout: A compact option for footers or landing pages.
For a professional appearance, the feed should match the website’s visual style. If the website uses minimal colors and generous white space, the Instagram feed should also feel clean and uncluttered. If the brand is bold and energetic, a carousel with captions and buttons may be more appropriate.
Step 5: Add the Feed to a Page or Post
After the feed has been created, it needs to be placed on the website. Most no-code plugins provide several display methods. The most common options are a WordPress block, a shortcode, or a widget.
With the block editor, the site owner can open a page or post, click the add block button, search for the plugin’s Instagram feed block, and insert it. Then they can select the feed they created and preview how it looks. This method is ideal for users who prefer a visual editing experience.
A shortcode is another simple option. Although it may look technical, it does not require coding. The plugin generates a small bracketed snippet that can be copied and pasted into a page, post, or shortcode block. WordPress then displays the feed in that location.
A widget is useful for placing the feed in a sidebar, footer, or other theme-supported widget area. The site owner can go to the widget settings, add the Instagram feed widget or block, choose the feed, and save the changes.
Step 6: Preview the Feed on Mobile and Desktop
Before publishing the final version, the feed should be checked on multiple screen sizes. Many visitors view websites from mobile devices, so a feed that looks attractive on a desktop monitor may need adjustments for smaller screens. Too many columns, large captions, or oversized buttons can make a mobile layout feel crowded.
A site owner should preview the feed on desktop, tablet, and phone views if the editor or page builder provides responsive preview tools. They can reduce the number of columns on mobile, hide captions, adjust spacing, or reduce the number of visible posts. These small changes can create a smoother experience for visitors.

Step 7: Optimize for Speed and User Experience
An Instagram feed is visual, and visual content can affect page speed. A slow website may frustrate visitors and reduce engagement. For that reason, optimization matters. A good plugin should support caching so the feed does not request fresh Instagram data every time someone loads the page.
Lazy loading is another valuable feature. It means images load only when they are needed, such as when the visitor scrolls near the feed. This can improve initial page loading time. The site owner should also avoid displaying too many posts at once. A homepage may only need six to nine Instagram items, while a dedicated social gallery page can show more.
It is also helpful to place the feed thoughtfully. If the main page goal is to sell a product, collect leads, or promote a service, the feed should support that goal rather than distract from it. For example, a feed may work well below a main call-to-action, near testimonials, or above the footer.
Best Practices for a Better Instagram Feed
A no-code Instagram feed is easy to add, but a strategic feed performs better. The site owner should think about what the feed is meant to achieve. It may be used to increase followers, display products, highlight customer experiences, show recent events, or add personality to the brand.
Several best practices can improve results:
- Use high-quality Instagram content: The website feed will only look as good as the posts being pulled into it.
- Keep the feed relevant: Content should match the page topic and visitor intent.
- Limit the number of posts: A smaller, cleaner feed often looks more professional.
- Include a follow button: This encourages visitors to connect on Instagram.
- Moderate tagged content: If displaying user-generated content, the site owner should review posts before showing them publicly.
- Check the connection regularly: Instagram permissions can expire, so occasional maintenance may be needed.
Common Issues and Simple Fixes
Sometimes an Instagram feed may not appear immediately. This can happen because of connection issues, expired permissions, caching, plugin conflicts, or theme styling. In many cases, reconnecting the Instagram account inside the plugin settings solves the issue.
If the feed looks broken, the site owner can clear the plugin cache and website cache, then refresh the page. If images are not loading, the plugin may need a settings update or a renewed Instagram authorization. If the layout looks unusual, changing the number of columns or switching templates may fix the display.
Plugin conflicts can also occur. If a feed stops working after another plugin is installed, the site owner may temporarily disable recent plugins to identify the cause. Keeping WordPress, the theme, and plugins updated is one of the best ways to prevent technical problems.
Final Thoughts
Adding an Instagram feed to WordPress without coding is a practical way to make a website more dynamic, visual, and connected to social media activity. With the right plugin, the process can be completed through a dashboard, setup wizard, and visual customization tools. Site owners can connect an account, choose a layout, place the feed with a block or widget, and adjust the design without touching a line of code.
The best Instagram feeds are not only easy to install but also carefully planned. They support the website’s goals, load quickly, look good on mobile devices, and showcase content that strengthens the brand. When implemented well, an Instagram feed becomes more than decoration; it becomes a living part of the website experience.
FAQ
Can an Instagram feed be added to WordPress without coding?
Yes. A site owner can use a WordPress Instagram feed plugin to connect an account, customize the layout, and insert the feed using a block, widget, or shortcode.
Does the website need an Instagram business account?
Not always. A personal account may work for a basic feed, but a business or creator account may be required for advanced features such as hashtag feeds, mentions, or deeper integration options.
Will an Instagram feed slow down a WordPress site?
It can if too many images are loaded or if the plugin is poorly optimized. A plugin with caching, lazy loading, and image optimization can help keep the site fast.
Where should an Instagram feed be placed?
Common locations include the homepage, footer, sidebar, about page, portfolio page, and product or service pages. The best placement depends on the website’s goals and layout.
What should be done if the feed stops working?
The site owner should reconnect the Instagram account, clear the plugin and website cache, update the plugin, and check whether Instagram permissions have expired.
Can multiple Instagram feeds be displayed on one WordPress site?
Many plugins allow multiple feeds. A site owner may display one feed on the homepage, another on a gallery page, and a different layout in the footer.